Adding a Logo
Before uploading a logo to your site, it's best practice to re-size the image to an appropriate size. The default CloudBase 3 logo dimensions are 243px x 45px. After re-sizing your image, you can also compress the image. High resolution images that are unnecessarily large in file size can slow down page load times. After re-sizing and compressing the image, there are two methods available for adding a logo.
CloudBase 3 Logo Feature
Disabling the Logo Feature
Creating a Custom HTML Module
CloudBase 3 Logo Feature
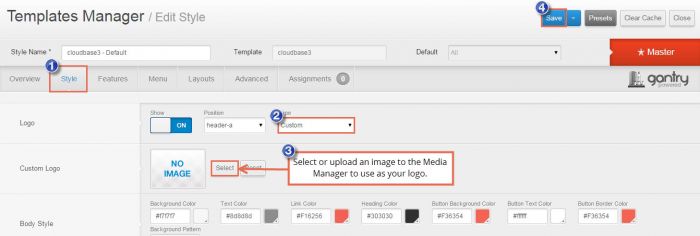
To upload a logo through the template itself, open the CloudBase 3 through the template manager. Click on the "Style" tab and you'll see the first Logo option. By default, the CloudBase 3 logo is there, but you can easily change it. Select Custom and a Custom Logo area will appear below. By clicking on the Select option you can select an image from your Media Manager or upload a new one. Be sure to save your work.
Please keep in mind that using this feature will place your logo at the top of all of your pages and if a user clicks on the logo on the front end, they'll be directed to your site's homepage. You can also make more space for your logo by adjusting the area by going to the Layouts tab. By default the logo is in the Header A position.
Disabling the Logo Feature
To disable the logo feature entirely, find the Show option and turn it to OFF. Be sure to save your work.
Creating a Custom HTML Module
Alternatively, you can add a logo to the site by creating a Custom HTML module. This is done through the Module Manager and the best position to use for the logo is one of the Top or Header positions.

Do you have suggestions for improving this article?
We take a great deal of pride in our knowledgebase and making sure that our content is complete, accurate and useable. If you have a suggestion for improving anything in this content, please let us know by filling out this form. Be sure to include the link to the article that you'd like to see improved. Thank you!


