CloudBase 3 - Demo, Download & Install
The CloudBase 3 template developed by CloudAccess.net is a versitale and flexible template built upon the Gantry Framework. This article offers a demo of the CloudBase 3, a download link and explains how to install a template and change default templates if you're new to Joomla.
Downloading the CloudBase 3 Template
Installing the CloudBase 3 Template
Changing Default Templates
Updating the CloudBase 3 Template
Changelog
Downloading the CloudBase 3 Template
The CloudBase 3 is a great template to learn from as you first develop a Joomla site. Its ease-of-use helps beginners get started and its feature-rich functionality exceeds the core templates that come with Joomla 3.
Installing the CloudBase 3 Template
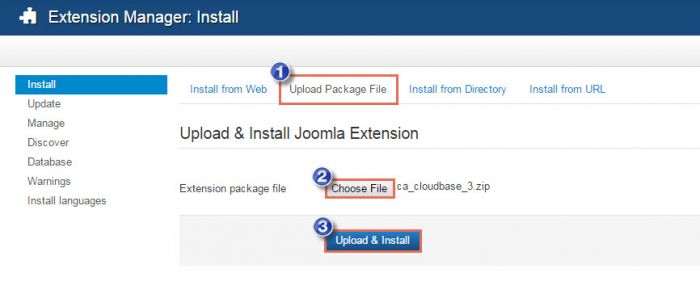
After downloading the template, log into the back end of your site, and open the Extension Manager.
In the Upload Package File area, choose the file from your computer. Once the name of the file appears in the field, click on the Upload & Install button.
You will receive a green message letting you know that the installation was successful.
Changing Default Templates
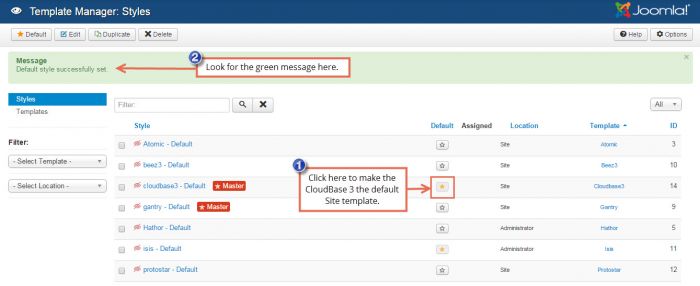
To change default templates and active the CloudBase 3 as the current template for your Joomla site, open your Template Manager. You'll see a list of all the templates available for your site. Some are for the Site, or the front end of your site and some are for the Administrator, or back end of your site. To make the CloudBase 3 template the active or default template for the front end of your site, click on the star symbol in the default column. You'll receive a green message letting you know that you successfully changed styles.
Now, return to the front end of your site to see the CloudBase 3 template active.
Updating the CloudBase 3 Template
If you are using older version of Cloudbase 3 (lower than 1.0.8) and want to get all current fixes, you need to follow the steps below, depending on the cutomization you have made.
If you have made a lot of cutomizations in your template files or you don't remember what exactly you have changed, you need to:
1. Check if you are running the latest Gantry Framework, to do so login to backend of your site then go to Extensions->Templates->Cloudbase 3. On the right you will see the Gantry version box. If it's red stating that Gantry is out of date, click the download link within the box to perform the update. Then within the Update component, mark Gantry 4 and click Update in upper left corner.
2. Unzip the cloudbase3_v1.0.9.zip file (you can download it from the Download section). After unziping cloudbase3_v1.0.9.zip, enter the cloudbase3_v1.0.9 folder and unzip cloudbase3.zip file. Within cloudbase3 folder navigate to changed files mentioned in Changelog section. Upload them respectively to your site's templates/cloudbase3 folder using FTP.
If you haven't made any file modifications in Cloudbase 3 template or all changes are included only in cloudbase3-custom.css (this file won't be overwritten), you need to:
1. Download cloudbase3_v1.0.9.zip file (you can download it from the Download section). Then install it through Extensions->Manage-> Install, same way as any other joomla extension.
2. Check if you are running the latest Gantry Framework, to do so login to backend of your site then go to Extensions->Templates->Cloudbase 3. On the right you will see the Gantry version box. If it's red stating that Gantry is out of date, click the download link within the box to perform the update. Then within the Update component, mark Gantry 4 and click Update in upper left corner.
Changelog
Version 1.0.9
- fixed: warning „Color has a deprecated constructor”
changed file:cloudbase3/features/color.php
- fixed: minor CSS bug
changed file:cloudbase3/less/menu.less
- removed: K2 overrides
changed file:cloudbase3/less/joomla-core.less
- added: social link for Instagram
changed files:cloudbase3/features/social.php
cloudbase3/language/en-GB/en-GB.tpl_cloudbase3.ini
cloudbase3/template-options.xml
Version 1.0.8
- fixed: broken error page after updating to Joomla 3.8.0
changed file:cloudbase3/error.php
- fixed: error when site is in offline mode after updating to Joomla 3.8.0
changed file:cloudbase3/offline.php
- fixed: compatibility with PHP 7.x
changed file:cloudbase3/html/mod_roknavmenu/themes/gantry-dropdown/layout.php
- updated: Cloudbase 3 version to 1.0.8
changed file:cloudbase3/templateDetails.xml

Do you have suggestions for improving this article?
We take a great deal of pride in our knowledgebase and making sure that our content is complete, accurate and useable. If you have a suggestion for improving anything in this content, please let us know by filling out this form. Be sure to include the link to the article that you'd like to see improved. Thank you!


