What is Smart Updater?
Smart Updater offers a daily automated update process based on your schedule and settings. It is available for every paid Joomla (2.5.5 and up) and Wordpress (3.9 and up) site on our platform.
It is comprised of 2 processes - The Update Availability Check and the Smart Update process - of which the first one is enabled for every compatible site but the second one needs to be enabled by you.
CloudAccess.net Smart Updater plugin
Both functionalities require a plugin installed on the site. It is included in every paid site provisioned on our platform (along with the AutoLogin plugin for our AutoLogin feature). If you’d like to learn how to disable those please look at this article for more information.
Update Availability Check
This process runs for every paid site on our platform. It’s results are presented in 3 places in the form of Update Availability Indicators. Those places are:
- Product list
- Site management view
- Application -> Overview area
Clicking an Update Availability Indicator will take you to the Smart Updater controller view if you have it activated for that site.
Controller view
On first access you will see this help your video. The video can be accessed after by clicking the question mark in the top right hand corner.
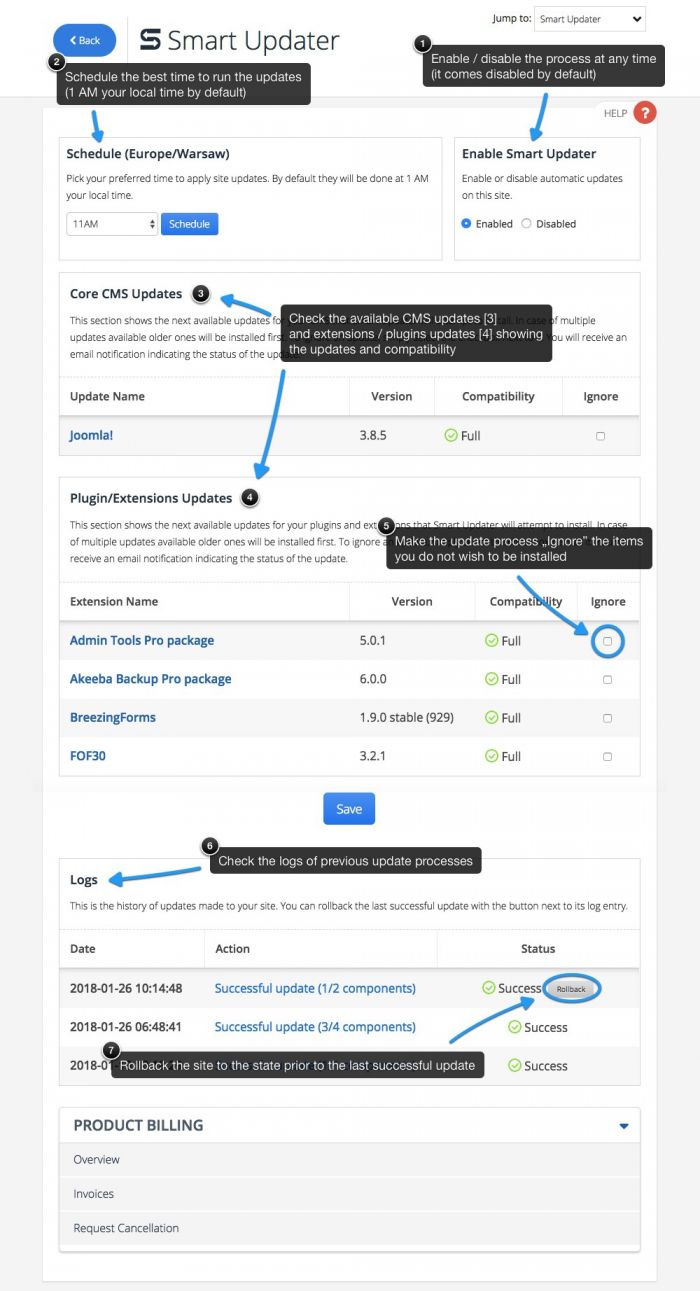
Here you can change the setting which will govern the Smart Update process:
- Enable / disable the process at any time (it comes disabled by default) [1]
- Schedule the best time to run the updates (1 AM your local time by default) [2]
- Check the available CMS updates [3] and extensions / plugins updates [4] showing the updates and compatibility
- Make the update process Ignore [5] the items you do not wish to be installed
- Check the logs of previous update processes [6]
- Rollback [7] the site to the state prior to the last successful update
Compatibility
There are 3 compatibility values which are based on the data from the CMS or other item’s update server:
Full - the update is fully compatible with the website's CMS version (x.y.z). Example: website CMS: 4.6.3, extension CMS compatibility: 3.5.0 - 4.8.1
Partial - the update is compatible with the website's CMS minor version (x.y.0) or even only with the website's WordPress major version (x.0.0). Example: website CMS: 4.6.3, extension CMS compatibility: 3.5.0 - 4.6.0 or 3.5.0 - 4.4.9
Unknown - the update is incompatible with the website’s CMS or the compatibility was not provided by the extension developer. Example: website CMS: 4.6.3, extension CMS compatibility: 3.5.0 - 3.9.5 or not provided
IMPORTANT: updates with Unknown compatibility will be automatically marked as Ignored and will need to be approved by you if you want them installed. This can be done by unignoring them in the controller view.
Advanced Settings
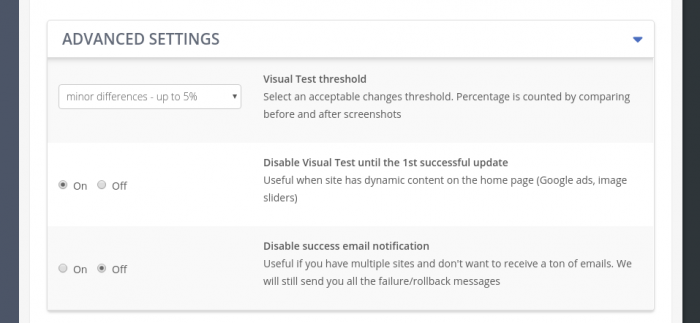
Advanced settings give you additional options to control the behavior of Smart Updater.
Visual Test threshold - The Visual Test process is described a couple of paragraphs up (if possible link to an anchor there). Currently, we allow you to choose between 3 levels of percentage changes that you want SU to tolerate. We can also set up a custom threshold on request. Please contact our support team if you need a custom threshold. Default value: 5%.
Disable Visual Test until the 1st successful update - This settings ignores the Visual Test results and accepts the update no matter the level of changes. It does it only once and switches back to respecting Visual Tests the next time the updates run. Useful when you need to force an update that you know will change your sites visuals. Default value: Off.
Disable success email notification - If you turn this on we will not send you the successful update emails. You will still be able to check all the data of the update in the Logs section. Default value: Off.
Smart Update process
This process is disabled by default and need you to enable it before it starts running.
The process starts with a backup which is taken prior to the time you specified.
The time needed to take a backup is estimated at first based on site size and then updated every time a new backup is taken.
Then Smart Updater checks the list of available and compatible updates.
Core CMS updates take priority and are done separately if present.
A “Before” screenshot of the homepage is taken.
Every package included in the update is downloaded and extracted on your site.
The process does not disable or delete the extensions/plugins it updates.
Items are updated.
An “After” screenshot of the homepage is taken.
Visual Tests are performed on the “Before” and “After” screenshots.
If the checks are not passed the site is immediately rolled back to the state prior to the update.
A log is created and you are sent a email notification with the update results and Visual Tests screenshots .
In case of a package failing to download or extract we mark it as ignored and only retry it when all other updates are successfully completed.
The whole process should take just a few minutes of which Visual Tests and potential Rollback take only seconds. The exact time depends on the number and size of available updates.
Here are the examples scenarios of the update process and statuses they produce:
Success
- At least one item installed properly and visual test created and passed
Failed
- All items extraction failure
- All items installation failure
- Failed to connect to update servers
- Updates performed, visual tests failed - site rolled back
Visual Tests and site screenshots
After comparing the “Before” and “After” screenshots the update is considered a Success if changes are below a 5% threshold.
In the near future we will add functionalities so our clients are able to define which subpages should the Visual Tests run on and also define the threshold they feel is acceptable.
Rollback
The rollback process is triggered by failed Visual Tests or manually in the Smart Updater controller view. The rollback process is almost instantaneous.

Do you have suggestions for improving this article?
We take a great deal of pride in our knowledgebase and making sure that our content is complete, accurate and useable. If you have a suggestion for improving anything in this content, please let us know by filling out this form. Be sure to include the link to the article that you'd like to see improved. Thank you!


